
The question asked most often is "How to install a dual-boot with Windows XP on my new Windows Vista computer?" The answer is that it’s not that difficult, it’s just very time consuming, and you need to own a copy of Windows XP.
Note that you should not attempt this if you aren’t ready to troubleshoot any problems that might occur.
The first issue we encounter is that computers with pre-installed operating systems take up the entire drive. Luckily Microsoft included the Shrink volume feature in Vista, so we can easily shrink the Vista partition down to make room for XP.
Open the Computer Management panel, which you can find under Administrative tools or by right-clicking the Computer item in the start menu and choosing Manage. Find the Disk Management item in the list and select that.

Now we’ll shrink our volume down by right-clicking on the main hard drive and choosing Shrink Volume.

Now you can choose the size that you want to shrink, which really means you are choosing the size that you want your XP partition to be. Whatever you do, don’t just use the default. I chose roughly 10gb by entering 10000 into the amount.

The next step might be confusing, because we need to change the cd-rom drive that’s invariably taking up D: at the moment, because we want to use D: for the Windows XP partition, but it’s already taken by the cd-rom drive. If you skip this step than XP will install onto the E: drive, which isn’t the end of the world, but it’s not quite as tidy.
Right-click on the cd-rom drive in the list and choose Change Drive Letter and Paths from the menu.

Now we’ll change the CD drive to use E: by selecting that in the drop-down.

Now we can create a new partition for XP to live on and make sure that the drive letter is set the way we want. If you do not create a partition now the XP install will do so automatically, but it’s easier and cleaner to do it this way.
Right-click on the Unallocated free space area and then select New Simple Volume from the menu.

Follow through the wizard and select whatever options you’d like, making sure to use D: as the drive letter.
Now you will need to close out of disk management and reboot your computer. This is because we can’t do the next step until we reboot. (you can try, but it won’t work)
So we’ve come back from rebooting… open up Computer from the start menu and then right-click on the D: drive and select properties. Give your partition a meaningful name like "XP". It would be wise to name the C: drive to "Vista" at this point as well.

Now you’ll want to pop your XP cd into the drive and boot off it. You may have to configure your BIOS to enable booting off the CD drive, or if your computer says something like "Hit Esc for boot menu" you might want to use that.
Once you come to the screen where you can choose the partition to install on, then choose either the unpartitioned space or the new partition you created. Whatever you do, don’t try and install onto your Vista partition! See how much cleaner it is now that we’ve labeled each partition distinctly?

We’ll assume XP is completely installed at this point, and you will have lost your ability to boot into Windows Vista, so we’ll need to use the VistaBootPro utility to restore the Vista boot loader.
Download and install VistaBootPro from vistabootpro.org
During the install you’ll be forced to install the .NET 2.0 framework. Open up VistaBootPRO and then click on the System Bootloader tab. Check the "Windows Vista Bootloader" and then "All Drives" radio buttons, and then click on the Install Bootloader button.

At this point, the Windows Vista bootloader is installed and you’ll only be able to boot into Vista, but we’ll fix that. Instead of manually doing the work, we’ll just click the Diagnostics menu item and then choose Run Diagnostics from the menu.

This will scan your computer and then automatically fill in the XP version.. click on the "Manage OS Entries" tab and then click in the textbox for Rename OS Entry, and name it something useful like "Windows XP" or "The Windows That Works"
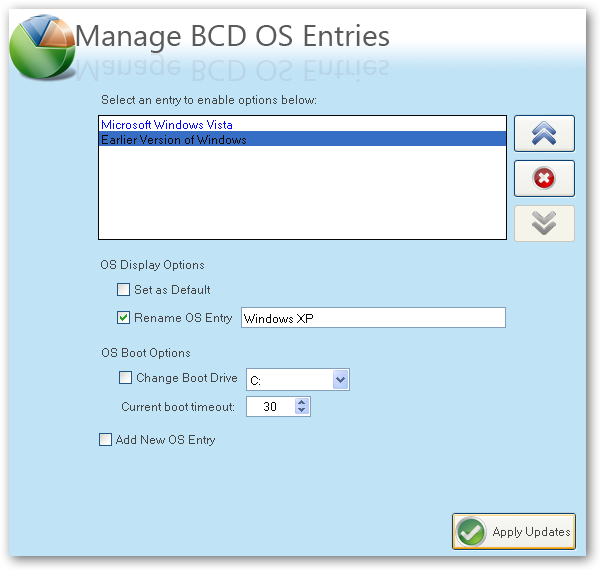
Click the Apply Updates button and then reboot your computer… you should see your shiny new boot manager with both operating systems in the list!

If you get an error saying "unable to find ntldr" when trying to boot XP, you’ll need to do the following:
- Find the hidden files ntldr and ntdetect.com in the root of your Vista drive and copy them to the root of your XP drive.
- If you can’t find the files there, you can find them in the \i386\ folder on your XP install cd
thanks to nrv1013
I had all kinds of problems trying to install XP to dual boot with Vista on my HP Pavillion dv6500t. I thought I would post my solutions in case anyone else is running into the same problems.
I successfully partitioned my drive:
C: Vista
D: HP Recovery
F: XP
Then I tried to install XP, which returned an error message saying hard drive not found. After wandering through various forums, I found out that XP doesn’t come with drivers for S-ATA drives. So I went to the manufacturer’s website (Intel) and downloaded the drivers. The easy option would have been to install them from a floppy drive. But since this is a laptop, that really wasn’t an option. The other option would be to disable S-ATA from the bios and install the drivers once XP is installed. However, HP locked down the BIOS and most of the features are unavailable. My only other option was to slipstream the drivers into the XP setup.
To do this, I used Nlite. While I was at it, I also slipstreamed SP2 and the drivers for my network card. But I hit another problem. Nlite only reads inf driver files but the Intel drivers came as an exe file. I tried the easy suggestion of extracting the files with Winrar but that didn’t work. So I just installed the drivers on another computer (which was running XP, but I’m not sure that it matters). Then I searched for *.inf and found the Intel folder (C:\Program Files\Intel\…) where the setup dumped the drivers.
Once Nlite finished, I burned a bootable disc from the ISO with Alchohol 120%. Then I rebooted and installed XP.
I had all sorts of problems with VistaBootPro. I followed the steps in the How To guide but I couldn’t get it to find XP. I eventually gave up and selected Add New OS Entry. I chose legacy version of Windows and named it XP. Then I rebooted. Now on my boot screen I had Vista, HP Recovery, and XP. But when I tried to boot into XP, I got an error saying the ntldr file was missing. It turned out that I needed to copy the ntldr (a hidden system file) that XP had dumped in my Vista root drive (C: which is my system drive) into the XP root (F:). Also, NtDetect.com needs to be with ntldr.
This is a critical piece of information: Windows XP will be installed on the D: drive, even in Windows XP… so you’ll need to keep that in mind when tweaking your system.

You can share information between the drives, but I wouldn’t recommend messing with the other operating system’s partition too much… it might get angry and bite you. Or screw up your files. What I do recommend is that you store most of your files on a third drive shared between the operating systems… you could call that partition "Data".


hmmm… nice… its annoying that laptops manufacturers don’t normally give you Windows CDs… if we format install XP and then try to install Vista using the provided CD… it clears everything on the first drive (concept behind Recovery/Diagnostic Discs) !!
a bit lengthy but worth the trouble if you just NEED xp and vista on your laptop !!