

One day I decided to make a 360 degree panorama with my DJI Phantom 4 Pro , so took it out and selected the Pano mode and it took 32 images and came back took out the SD Card from DJI so I could upload them on Facebook – guess what !!! .. there is alot of post processing required. The first thought was that Facebook 360 photo is not working but turns out it need few steps.
In this post I will be explaining the simplest and quickest way to make 360 Degree Panoramas (or less if you like) and upload them on Facebook so Facebook detects them as a 360. You can also use this in making a drone 360 for your Facebook Cover of a page/profile
Steps Involved to make Facebook friendly Panoramic with DJI
- Select Pano mode in DJI
- Stick all the Images together
- Resize the images as per Facebook guidelines
- Edit EXIF Data of the image so Facebook can be fooled into believing that its a panoramic
The steps might seem alot but they aint much, the most time will be how slow your system is to stitch the images etc together. So let’s get onto with the Tutorial
Whats needed for making Facebook friendly Panoramic
- DJI Drone – Obviously, as we will use this to take the snaps
- Microsoft ICE – Microsoft has made a very decent software which does align the images and make it all neat and tidy. Download Microsoft Image Composite Editor (ICE) and install it like any normal software
- Image Editor – Any basic image editor because we will use that to resize the panorama which would meet the requirements of Facebook
- EXIFToolGUI – EXIFToolGUI is a GUI version of EXIFTool which we will use to change the exif data of the image making Facebook to believe its a pan image. Download EXIFToolGUI
Lets dive in with the tutorial part
Step 1 : Take Images
You might be familiar with this step , just fly your drone to the place where you want to capture the 360, on your DJI GO 4 App click on “Settings” below the shutter > select the camera tab >click on “photo” > select “Pano” [Sphere option will be selected by default]. The video demo will explain it even better
After you have taken the images, take out the SD card and place it in your machine.
Step 2 : Stitch Images to make a Panorama
- Open Microsoft ICE which you downloaded earlier
- Click on “New Panorama from Images” and select all the images of the panorama you just took
- Images will appear on ICE , on top right side you will see “Next” click that to proceed to “2.Stitch” on ICE. The process will take a bit of time for Aligning and Compositing Images.

Import Images on ICE and click next to proceed to Step 2 which will Stitch the Panorama - On Step 2 of ICE , again hit next without changing anything , by default you will see that “Spherical” will be selected which is also the option that we need
- On Step 3 of ICE, click on “Auto Complete” as it will fill in the small spaces which might be left earlier. Once done again click “Next“
- Step 4 of ICE which is “Export” just click on “Export to disk” , which is under the “Image” option. you can increase the image quality if you want but the default quality is pretty HD ,so much that one can even zoom in .

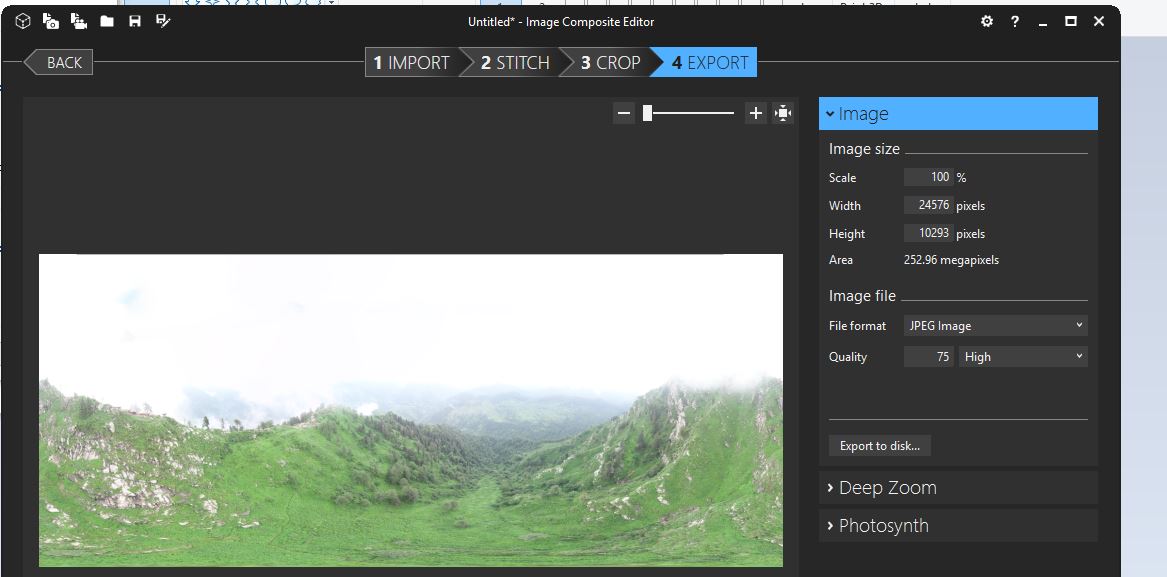
Step 3 : Resize Panorama to fit Facebook requirements
Facebook 360 guidelines say that the Height (Vertical) should be half the Width (Horizontal). Open the last panoramic created above in your favourite image editor, I will use MS Paint as its simple.
- Open Image in MS Paint
- Click on Resize
- Select “Pixels“
- See the width and enter half of that in Height, so if your image width is 24576 pixels enter height of 12288 pixels
- Uncheck “Maintain aspect ratio” and hit OK
- Save and Close the image
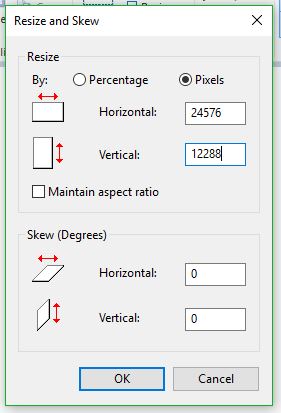
Note: MS ICE saves the panoramas with 24576 pixels of width and 94567 pixels of height, so you will need to adjust the height every time
Step 4 : Make Facebook think our Panorama is 360 Degree of pure Awesomeness
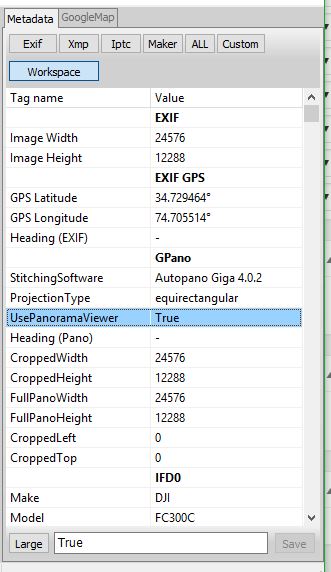
DJI doesn’t add the default Panoramic EXIF metadata so if you upload the above image it will be treated like a flat image , here he will make Facebook think its a Pano.
- Open ExifToolGUI you downloaded earlier
- Navigate to the folder where you saved your finished image and click on it.
- Now Look towards the right pane which says “Metadata” , Enter the settings which I am providing below leave the rest to their default
- Stitching Software – Autopano Giga 4.0.2
- Projection Type – equirectangular
- UsePanoramaViewer – True
- Cropped Width – [Enter the width of your image]
- Cropped Height – [Enter the height of your image]
- FullPanoWidth – [Enter the width of your image]
- FullPanoHeight – [Enter the height of your image]
- CroppedLeft – 0
- CroppedTop – 0
- Make – DJI
- Model – FC300C
- Hit “Save” after making the changes and close the program
- The final settings would look something like this:
Step 5 : Upload your 360 Panorama to Facebook
Open Facebook and upload your image like any normal image and Facebook would automatically detect it as a panorama with no additional settings or tweaking from your end. See one image I uploaded on a Page just as a demo
Hope this Helps !!! ask if you have any questions or tips … Show us your Panoramas aswell 🙂


[…] Source link […]